Today, I’ll break down a WordPress plugin that I created (with a little help from Claude.ai), this is a simple yet attractive weather widget using the OpenWeatherMap API and animated weather icons Meteocons . This plugin allows WordPress site owners to display current weather conditions for any location with a clean, modern display, just enough settings to customize and fit your site.
If you find this plugin useful kindly leave some github ?? stars, and or comment below with any suggestions..
Examples
Here are some shortcode samples of current weather around the world.
[weather location="Lisbon,PT" temp_unit="C" show_high_low="true" show_wind="true" show_descripaution="true"] |
[weather location="Sydney,AUS" temp_unit="F" show_high_low="true" show_wind="true" show_description="true"] |
Shortcode Usage
You can display the weather widget anywhere in your content using the [weather] shortcode, This will take the weather values set in the Settings >> Weather Widget and display the current realtime weather at that location.
Advanced Usage
You can customize the widget display using these attributes:
location– City and country code (e.g., “Paris,FR”)temp_unit– Temperature unit (“F” or “C”)show_high_low– Show high/low temperatures (“true” or “false”)show_wind– Show wind speed (“true” or “false”)show_description– Show weather description (“true” or “false”)
Examples
// Basic example with location[weather location="Tokyo,JP"]
// Full example with all options[weather location="Paris,FR" temp_unit="C" show_high_low="true" show_wind="true" show_description="true"]
// Minimal display[weather location="Rome,IT" show_high_low="false" show_wind="false" show_description="false"]
Template Usage
To use the shortcode in your template files, use this PHP code:
do_shortcode([weather location="London,UK" temp_unit="C"])Github Code
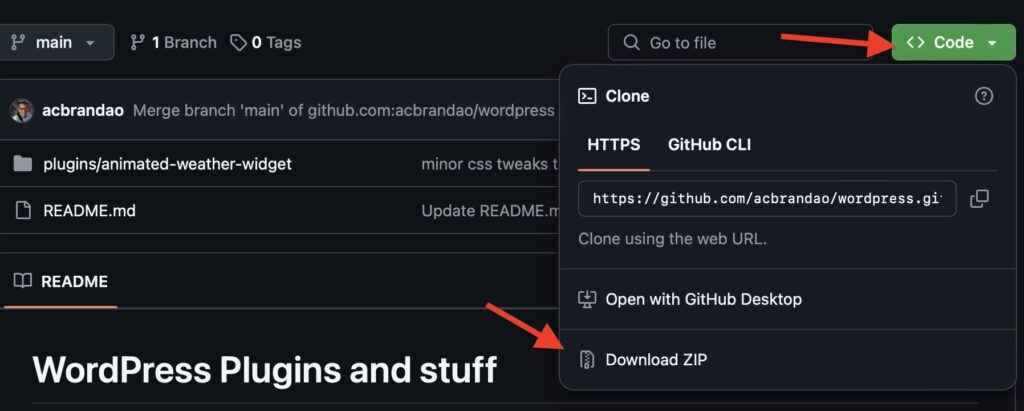
You can find the latest code here: https://github.com/acbrandao/wordpress-widget-animated-weather to install follow the steps below.
Core Features
- Real-time weather data from OpenWeatherMap API
- Animated SVG weather icons ( Meteocons) that change based on conditions
- Displays temperature in both Fahrenheit and Celsius
- Shows additional weather details like wind speed and temperature ranges
- Customizable location settings per widget
- Customizable gradient start and end colors to match your sites color scheme
- Admin panel for API key configuration
Understanding the Code Structure
The plugin is built around a main class Animated_Weather_Wdiget that extends WordPress’s WP_Widget class. Let’s break down the key components:
Widget Initialization
The constructor sets up the widget basics and enqueues necessary styles:
 public function __construct() {
        parent::__construct(
            'animated_weather_widget',
            'Animated Weather Widget',
            array('description' => 'Displays weather widget using OpenWeatherMap API with customizable display options')
        );

        add_action('wp_enqueue_scripts', array($this, 'load_plugin_styles'));
        add_action('wp_enqueue_scripts', array($this, 'load_fontawesome'));
    }
Weather Data Retrieval
The plugin makes API calls to OpenWeatherMap using WordPress’s built-in wp_remote_get() function. The data is fetched in metric units and later converted to imperial where needed: Be sure to get your OpenWeatherMap API key this is a simple process that just requires registering with the site.
private function get_weather_data($api_key, $location) {
    $url = add_query_arg(
        array(
            'q' => urlencode($location),
            'appid' => $api_key,
            'units' => 'metric'
        ),
        'https://api.openweathermap.org/data/2.5/weather'
    );
}
Smart Weather Icons
One of the coolest features is the dynamic weather icon system. The plugin includes SVG icons that are selected based on weather condition codes from OpenWeatherMap. It even accounts for day/night conditions:
private function get_weather_icon($condition_code) {
    $current_time = date("H");
    $icon_clear_day = "clear-day.svg";
    $icon_clear_night = "clear-night.svg";
    $weather_icon = ($current_time >= 20) ? $icon_clear_night : $icon_clear_day;
    // ... condition code handling
}
Settings >> weather-widget Configuration
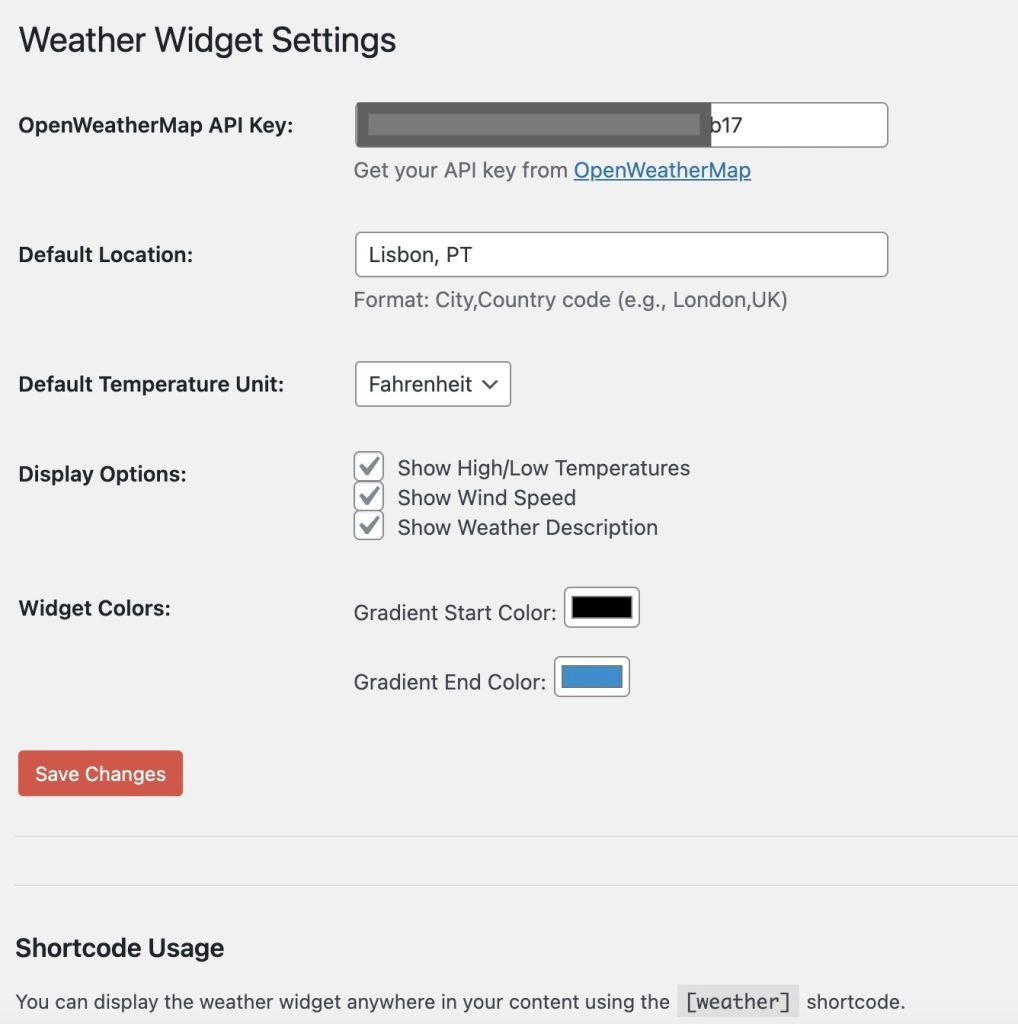
The plugin includes a settings page (see weather-widget) in the WordPress admin panel where users can:
- Enter their OpenWeatherMap API key
- Set a default location
- Configure individual widget instances with custom locations via shortcodes
- Hide or Show various weather details, like high /low temps, wind
- Customization of color scheme

Frontend Display
The weather data is displayed in a clean, organized layout with FontAwesome icons for additional visual elements. The widget shows:
- Current location and time
- Temperature in both Fahrenheit and Celsius
- Weather condition with animated icon
- High and low temperatures
- Wind speed
- Weather description
Security and Best Practices
The plugin implements several WordPress security best practices:
- Direct file access prevention
- Data sanitization for API key and location inputs
- Proper escaping of output data
- Use of WordPress’s built-in HTTP API
- Proper enqueueing of styles and scripts
Additional CSS Customizations
Remember that if you need to further style the widget using CSS (not shown in the code snippet) to match your theme’s design. The plugin’s use of FontAwesome icons and SVG weather icons ensures crisp, scalable graphics across all device sizes.
Installation and Setup
First you’ll need a to obtain an API key from OpenWeatherMap. then,,,

The Plugin is not yet available in the WordPress Plugin repository (still awaiting approval, was just submitted on 1/8/2025) in the meantime, you can install it yourself, by just downloading the Github Zip file directly from https://github.com/acbrandao/wordpress-widget-animated-weather
To use this plugin, you would need to:
- Install and activate the plugin in WordPress
- Obtain an API key from OpenWeatherMap
- Enter the API key in the WordPress admin #settings
- Add the weather widget to your desired widget area or use [weather] shortcode in your content
- Configure the location for each widget instance
Conclusion
This weather widget plugin demonstrates clean, efficient WordPress development practices while providing a useful feature for WordPress sites. The combination of real-time weather data with animated icons creates an engaging user experience, while the admin interface makes it easy to configure and customize. Enjoy the widget and please feel free to comment below and suggest enhancements.
Awesome Weather widget! just what I was looking for
Very nice love the look can you add a daily forecast below the weather?
great plugin , just what I was looking for the other ones in plugin market were too complicated, this one is just right, I wish it had the option to do 3-day forecast.
Can you provide an option to show fore ast below current weather? Nice work , appreciate it.