If you’re a developer of a certain age (say north of 35) you will likely have worked with or heard of Visual Basic and to a lesser known extent Delphi IDE (Integrated Development Environment) development platforms. These development IDE’s, were very popular in the mid to late 90’s and ushered in an era or rapid Windows applications development, by letting you visually build your rich Windows applications, such as dragging and dropping widgets on the screen and then attaching event-driven code actions, such as button clicks , to them.
This was great for rapidly prototyping and developing rich graphical applications, and orders of magnitude faster than writing Windows apps using the heaving-iron tools of the time of C/c++ compiling the very large and overwhelming windows API. Ironically even 2016 some of the popular IDE’s for for web or mobile development still use the same classic IDE design pioneered by Visual Basic, with choices like Adobe Dreamweaver and Apple’s Xcode and Android Studio are trying to re-create the magic of those 90’s IDE’s but sometimes just fall short.
Although the hey days of rich Windows client applications ( or Mac, or Linux ) are behind us with developers mostly focusing their efforts today on the web browser and native mobile apps , there are still use cases when full-blown rich client applications need to be developed for the PC. While Visual Basic (Microsoft) and Delphi (Embarcadero) are still around in their modern incarnations, I want to discuss another compelling open-source, cross platform alternative, Lazarus.
Enter Lazarus – open source cross-platform IDE
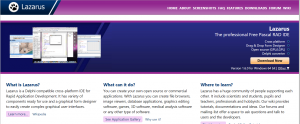
Lazarus IDE home page
Lazarus is an open-source IDE modeled on Delphi, it’s a true cross-platform IDE (it runs on Windows, Mac or Linux) that allows you to write Object Pascal code and cross compile it on a variety of supported Operating systems, including , Mac OS X,Microsoft Windows,Linux, FreeBSD, Solaris, and several others such as ARM infrastructures which have varying degrees of support. This means if you need to write that windows rich-client application and also need to create a Linux or Mac port, then by using Lazarus you’re all set. Here’s a brief summary of some of the pro’s and con’s of the Lazarus IDE circa 2016.
Interested grab yourself a copy (for Windows, Mac or Linux) and try it out.
Simple Loan Calculator – GUI Lazarus Style..
Let’s demo how easily we can create a windows application with Lazarus, lets move one step beyond the customary hello world (since that would only an exercise in some drag and drop and typing) and create a simple car loan calculator (that will allows us to highlight the core IDE event-driven features) , to demo some of the gui widgets and event-driven code. First you’ll need to acquaint yourself a little (promise just a little) with Object Pascal. If you’ve programmed before you can just read the code below, it should be fairly understandable. Heres a nice basic Object Pascal Tutorial. Here’s one one Object PAscal with Lazarus (YOutube):https://www.youtube.com/watch?v=0VPvQ_dXMhw
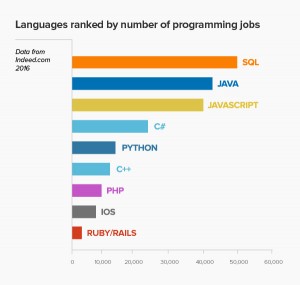
2016 Most Popular programming languages
I’ll grant you Object Pascal may not be as popular as other modern languages like Java, Javascript, Python, PHP, C++ , but there are still plenty of online resources and tutorials (Lazarus IDE Turoial or a Free Pascal tutorial ) to help you get started. Additionally the language architects of object Pascal , have a great pedigree and have gone on to become giants in the language development space (Anders Hejlsberg received the 2001 Dr. Dobb’s Excellence in Programming Award for his work on Turbo Pascal, Delphi, C# and the Microsoft .NET Framework and NiKlaus Worth is also a legend in the field of computer language development, 1984 Turing Award winner)
Object Pascal is technically a separate language, Lazarus IDE simply adds the GUI constructs and API’s to provide you with a visual framework and event-driven environment. You can easily forgo the GUI and easily write console mode (CLI) applications in Object Pascal (and Lazarus) .
But the purpose of this post is to focus on rich client GUI applications, so we’ll stick to the Lazarus IDE and its use of event-driven object pascal. So Go ahead and download Lazarus ( up to version 1.6 as of Feb 2016 ) , install the Lazarus IDE on your machine and follow the steps below.
Step 1. Start a New Project
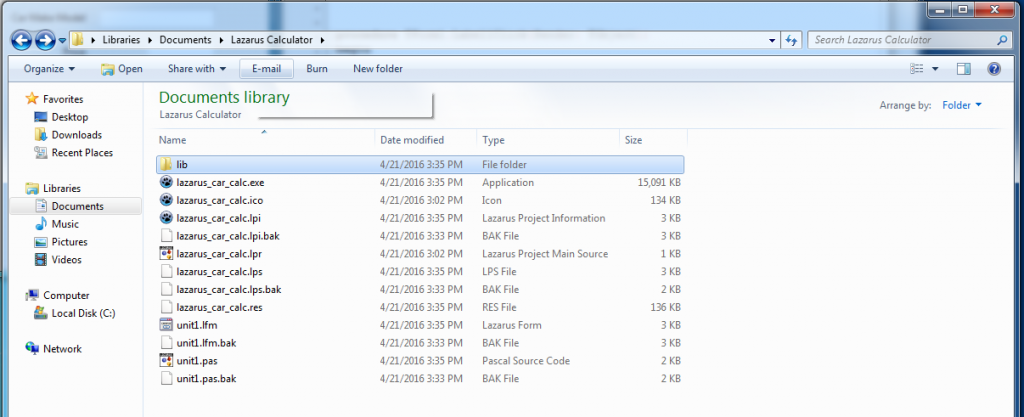
Lazarus project files
Launch the Lazarus IDE. Lazarus , once its done loaded you’ll be shown a typical IDE display with toolbar, component palette, object inspector (left side and main code/window . This IDE takes its roots from the Delphi IDE , when you create your project, it breaks up your code into project files (.lpi) and form files (.frm), plus about half dozen other supporting files, they are all bundled together via your .lpr file (You Project Main source file) , think of it like a manifest file, and typically all reside inside a project folder.
These files are both text-based formats where your code , window layouts , widget placements and a variety of other code data about your application is kept. The project files contain a meta-data about the projects, including a list of all the form files (analogous to the pages/windows of your application), general project settings such as compiler settings etc. The .frm files contain actual description of the forms (windows) , varies property and event-driven code you write. Any supporting images, sounds or other components, are typically stored in appropriate named folders withing the project folder and may have other extensions, for example multiple icons (glyphs) may be composite into a single file, named .img etc. All this code and settings are typically stored in your project folder, and managed via your .lpi file. Just remember to move everything when copying files.
The good news, is all this source code is typically compiled into a single .exe (or corresponding executable on a Mac , or Linux) for deployment, in a few cases (such as those that make heavy use of supporting graphics, binary data etc.) you may need to deploy those files along with your executable. But generally its a statically compiled/ self-contained system.
Step 2. Design your form, add widgets
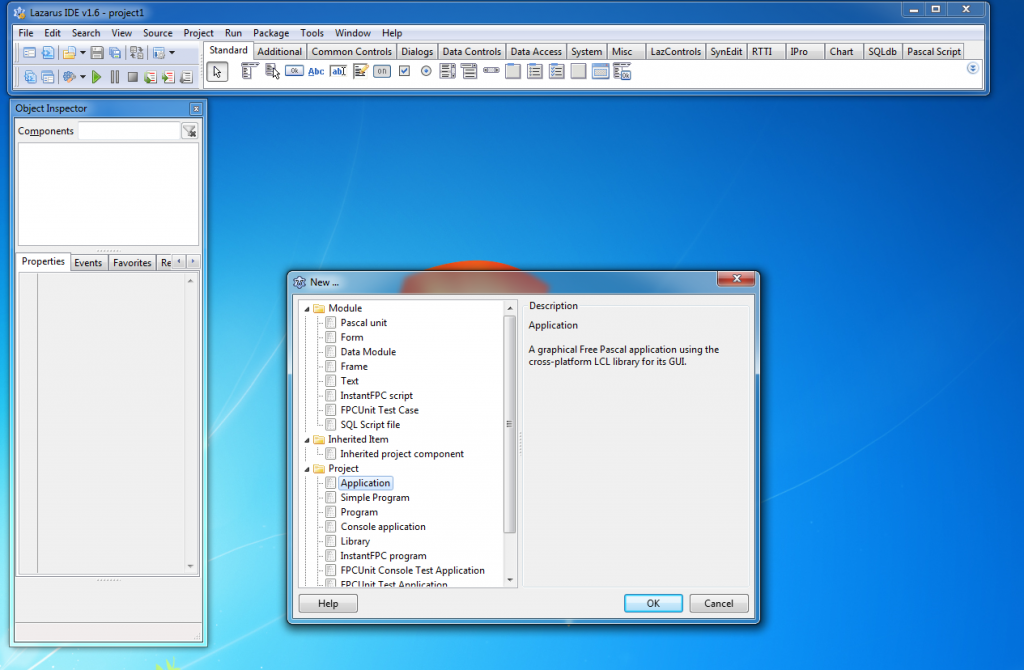
Lazarus create a new GUI project
Start Lazarus, then Choose, File >> New… (a long list of items will be shown), under Project Choose Application for a GUI (also the is Program and Simple Program which are variations of console applications). Choosing Application will bring up the IDE with the blank form (with grid of dots to snap components to ) and the code for the events in the window behind the form. Be sure to Save your project using Project >> Save Project form the top menu.
At this point you can re size the Form , also notice as you click on the Form, the object inspector on the left hand side will show you all the relevant properties related to the form, you can modify this to suit your needs. Also as you add components later from the palette toolbar, the object inspector will change to show the properties corresponding to the object you have selected.
Re-size the form, then next lets drag and drop some Labels, labels are read-only, and are used to place text on your form (They c
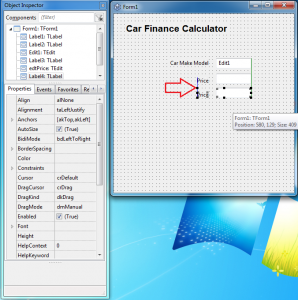
Lazarus IDE using GUI layout tools
an be changed later programmatically) . To Create a label click on the label from the toolbar pallet (looks like the letter Abc) , then click on the empty form and place the label, finally go to the Object inspector and go to the property caption and change it to the text you want it to read. Also experiment with changing other properties in this example I’ll change the Font and make the label larger. We’ll repeat this process for other labels on this form. By dropping the label on the form, code was written defining the label, you can press F12 to toggle between the Form and Code Windows.
Next we’ll repeat the process and add subsequent labels for Car Make/Modl, Pricing etc… To the right of each of these we’ll place a Tedit (and Edit field), looks like a text box with the ab| icon on the palette. Tip to add more components you can always go to the palette toolbar, but you can also easily copy (Control+C) and Paste Control+V existing components on your form, just don’t forget what they are names, notice in the Object inspector the corresponding name (Label1, Label2, Edit1 …),its really important as your form gets larger its easier to rename them by changing the name property of each component so you can refer to them later in your code. Generally its recommended you use an abbreviate prefix like lblCarModel and edtPrice for naming Label and Edit components respectively. Also keep in mind edit components hold their value in the Text field (different than Labels, which hold it in the caption field) .
Build the complete form as shown below, note the different components in use, mostly labels, edit fields, one drop down and a few buttons, refer to the components tree on the left side, notice how I changed the names of the components to more easily identify them. Now that we have our complete form, lets add, some code. . This is the event driven part,keeping our application simple most of our code will be tied to clicking on the buttons, but you can add event code to any component, by just double-clicking on it..
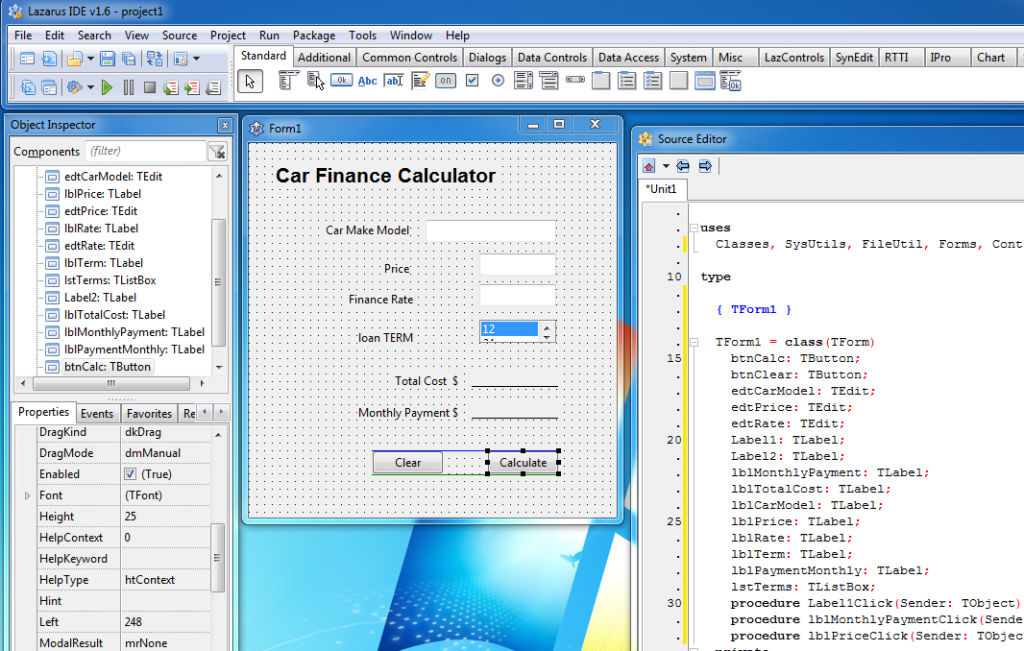
The complete Lazarus Car Finance Calculator
Step 3. Write the event driven code
Let’s click on the button named Calculate, when you do this the code window will come to the front and you will be placed inside the code function where you right the event code for this action.We now write the event code inside the begin end. Refer to each component by its name.
procedure TForm1.btnCalcClick(Sender: TObject);
begin
edtTotalCost.Text := FloatToStr( StrToFloat(edtPrice.Text) * StrToFloat(edtRate.Text)/12 * StrToFloat(lstTerms.GetSelectedText) ) ;
edtMonthlyPayment.text :=FloatToStr( StrToFloat(edtTotalCost.Text) / StrToFloat(lstTerms.GetSelectedText) ) ;
end;
In our case, our code is shown below, basically we do a simple math calculation of taking the Price * finance rate/12 * load term. Then we assign (in Pascal the assignment operator is the := ) the result to the Total cost and the monthly payment edit fields.
We do need to wrap the edit fields in the StrToFloat(..) and FloatToStr(…) functions to convert their text numbers to float used in the math and vice versa. That’s it in just two lines of code we’ve created a simple calculator..
Now lets write the code to reset the form back to its initial state. Double click on the Clear button and mostly assign the default values to the components.
procedure TForm1.btnClearClick(Sender: TObject);
begin
edtTotalCost.Text :='';
edtMonthlyPayment.text:='';
lstTerms.Selected[0];
edtRate.Text:=FloattoStr(3.40);
edtPrice.Text:='';
edtPrice.SetFocus;
end;
Notice the use of SetFocus on the editPrice so the window’s focus goes right to that box after we clear it, as a convenience. that’s it now we have a running Windows GUI application (albeit a very simple one).
Step 4. Compile and Run your project
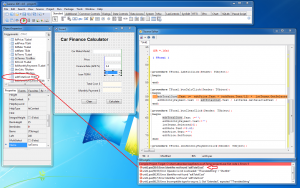
Lazarus debugging a syntax error
to Test Run the code press the Run button (F9) on the IDE’s toolbar. Lazarus will now try to compile the code if there are any syntax or other errors it will stop and show yo the first line. with a brief explanation below. Start from the top and fix each one and try running again. In my first try its complaining about the edtTotalCost not identified, this sometimes happens when you rename components the names in the code are not matching the component name, simply correct them to make the match. No enter some numbers in the corresponding fields and press calculate. IF all goes well then you should get the Total Cost and Monthly Payment fields filled in.. Now press clear and it should empty all the default values. If you press Calculate without any values for Price you’ll see a Runtime error, this means you program crashed, because it tried to calculate empty values. IF you press break it will return you to the code, but generally at this point its best to press the STOP icon on the toolbar, and fix the error.
Step 5. Debugging and project settings
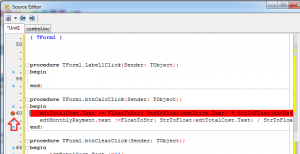
Lazarus setting a break point
Debugging, Lazarus is an integrated debugging environment allows you to stop at certain parts of the code while its running, you do this by creating break-points (points where the code will stop ), do this by opening up the code window (F12) go to the line you want to stop at, and press the small blue dot to the left of the line. No Run the program again and this time the code will stop and bring up the code window, and allow you to hover over components, and variables and add watches etc.. so you basically can step through the program line by line to see it running.
When you’re satisfied that your program is ready to go, You can choose Run > Build (Shift_F9) and it will create the corresponding executable for you. Now you can distribute your executable .

The complete Lazarus Car Finance Calculator
This is only scratching the surface of the Lazarus IDe, there’s so much more that it can do.
Download the Lazarus Calculator zip file
Rich IDE LCL component palette.
You probably noticed from where we grabbed a few of the GUI widgets, this pallet of which there are a dozen tabs contains all sorts of widgets from basic to enhanced GUI widgets , database, socket, sound, charting components etc.. These component officially dubbed LCL component or packages, can be created and installed by folks and extend the IDE’s capabilities with a virtually endless supply of code. There’s an active community that is always building or upgrading components, You can find them here at the Lazarus Component Directory.
Conclusion
That’s it, easy right? you just created a windows application, that is self-contained (ie. statically linked) rich client application and now you can distribute it . If you need an Mac or Linux equivalent, simply cross compile the same code on those platforms, and presto, you now have the exact same app on all three platforms. It’s not always that easy, as there are inherent differences between OS’s but for standard GUI applications it should be pretty straightforward.
As I noted earlier while the days of rich-client GUI applications may no longer be as common place as in the past, but there are still use cases especially if your application makes heavy use of the OS , graphically intensive or interacts directly with hardware.
In addition to the main PC computing platforms there are some nascent attempts at using Lazarus to build non -pc applications, such as this page outlining using Lazarus of Android Application development or Lazarus cross-platform ARM development , such as Lazarus on Raspberry Pi , but like anything else new, these projects are still in their early stages, and there’s quite a bit of a alpha development still head, for now I would stick to the main PC computing platforms for Lazarus development.
Developing in Lazarus is the fastest way to build quality native rich client applications (PC ) quickly, maximizing the power of your machine , the best part it’s pretty easy to learn. ahhhh the joys of re-discovering…..
What compiler does it use for the code?
Update: Here’s code to perform a a more accurate monthly payment calculation taking amortization into account..
procedure TForm1.btnCalcClick(Sender: TObject);

var P, r,A,totalCost,monthlyPayment : real;

  n: integer;

begin

 {

  Auto loan calculation is as follows: This is amoritzatin formation

  Use the formula  A=P*(r(1+r)^n)/((1+r)^n-1).

  A = the monthly payment.

  P = the principal

  r = the interest rate per month, which equals the annual interest rate divided by 12

  n = the total number of months

  i = interest amount

 }
P:=StrToFloat(edtPrice.Text); { get principal }
r:= StrToFloat(edtRate.Text)/100/12 ; { interest rate per month }
n:= StrToInt(lstTerms.GetSelectedText) ; {total months - term }
A:= P * (r* power(1+r,n) ) / ( power( 1+r,n) - 1 ) ; { monthly payment formula }
edtTotalCost.Text := FloatToStr(Round(A*n)) ;
edtMonthlyPayment.text :=FloatToStr(Round(A) );
edtTotalInterest.Text := FloatToStr(Round(A*n) - P ) ;
{ simplistic claculation
edtTotalCost.Text := FloatToStr(StrToFloat(edtPrice.Text) + ( StrToFloat(edtPrice.Text) * StrToFloat(edtRate.Text)/100/12 * StrToFloat(lstTerms.GetSelectedText) ) ) ;
edtMonthlyPayment.text :=FloatToStr( StrToFloat(edtTotalCost.Text) / StrToFloat(lstTerms.GetSelectedText) ) ;
}
end;
This is an excellent tutorial that illustrates how straightforward Lazarus is for basic apps.
Well written and illustrated.
Thanks, I’m a big fan of Lazarus for putting together quick Rich client apps.. Hopefully in the future they will add some mobile platforms, that would be fantastic..
This tutorial is encouraging me to explore the mysteries of lazarus.
This tutorial is excellent.